WooCommerce 3.3.0+
WooCommerce is an open-source e-commerce plugin for WordPress. Koalafi's WooCommerce plugin allows you to provide your customers who qualify for financing a seamless checkout experience.
Koalafi's WooCommerce plugin supports two different flows:
-
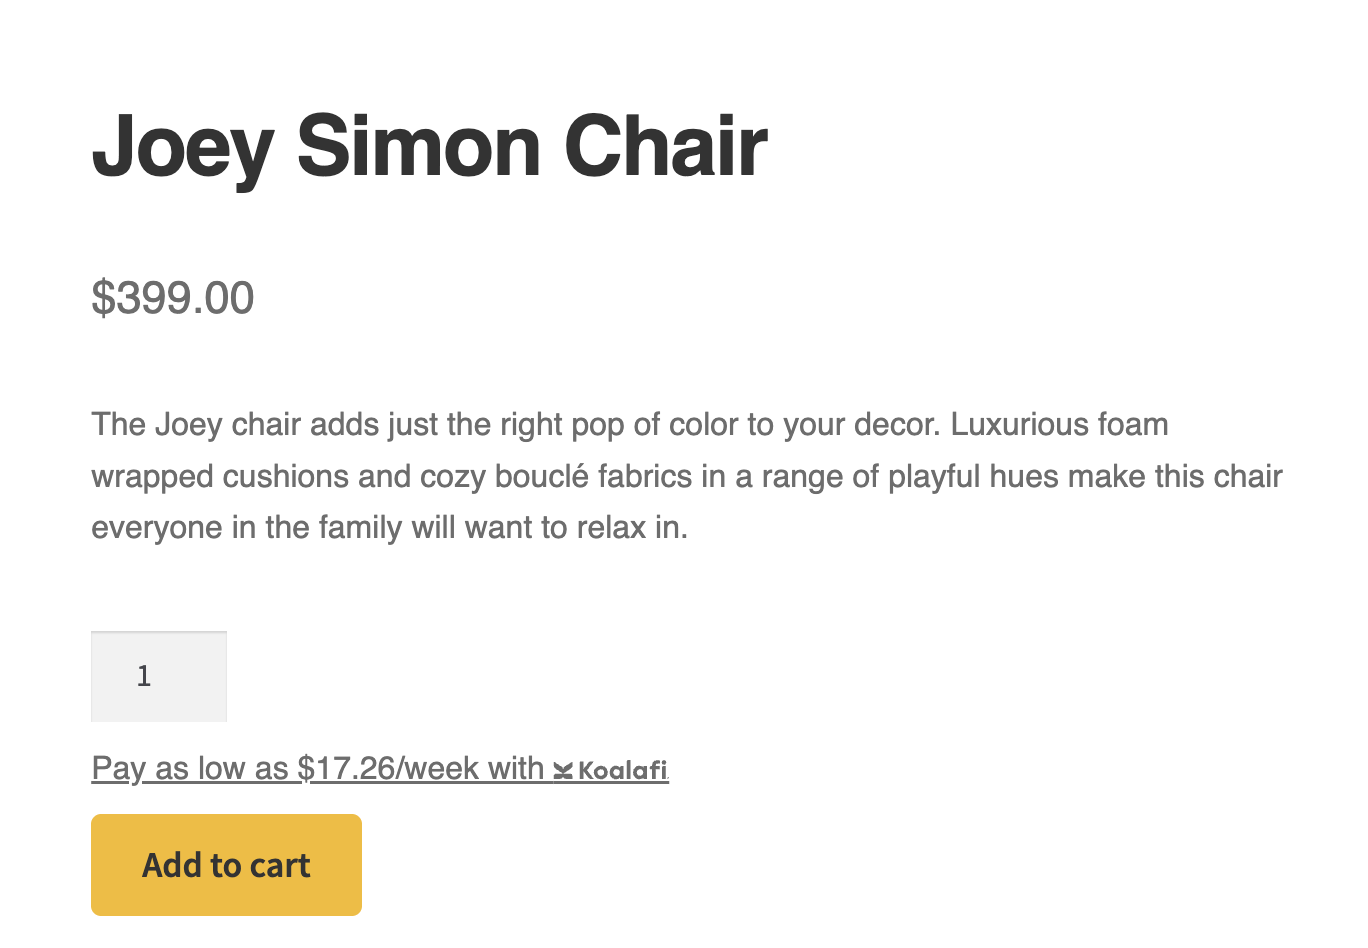
Apply - Customers can click buttons that you set up throughout your site (typically on a financing page and your product pages) to receive an approval amount so they know how much they have to shop with.
-
Checkout The Koalafi Payment Gateway integrates with the existing payment options on the checkout screen so that customers can complete their application flow (if they already applied through the apply first flow) or initiate the entire Koalafi application and checkout from the checkout page.
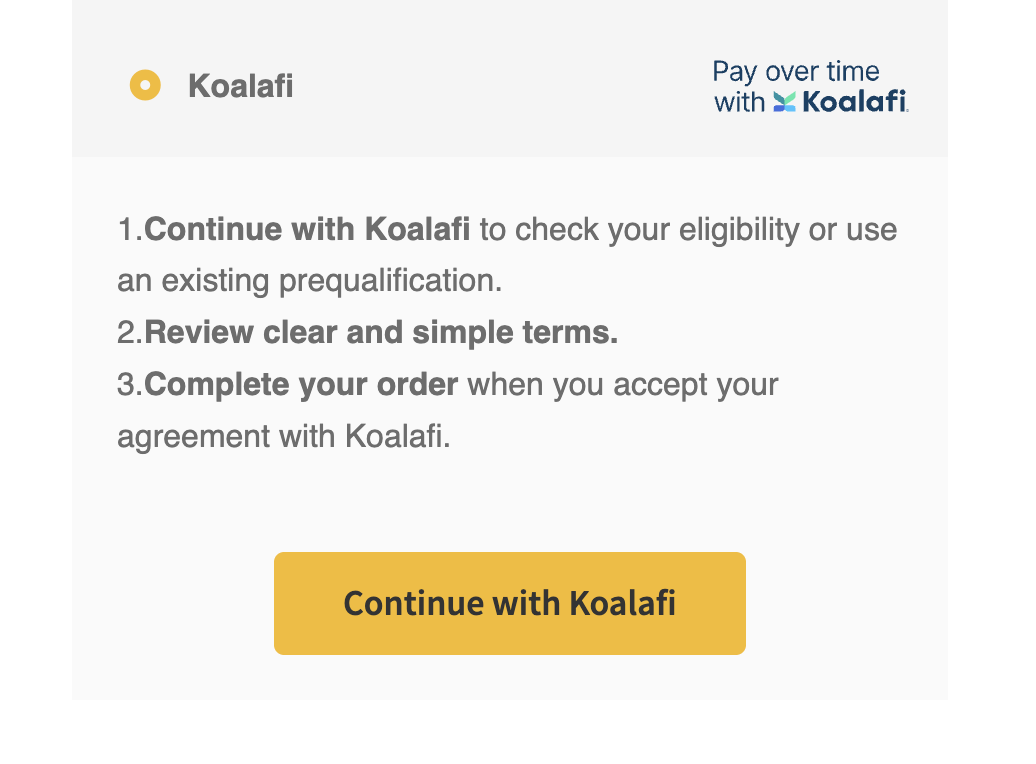
Clicking any of these buttons pops up the Koalafi modal and walks the customer through the application process.
Installation
- Please reach out to the Koalafi team to get the latest version of the plugin. The plugin will be in .zip format.
- On your WP admin page, navigate to the plugin page. It will be an option on the left nav bar

- On the plugin page, click the "Add New" button at the top left of the page

- On the following page, click the "Upload Plugin" button at the top left of the page

- Using the "Choose File" button, select the .zip of the Koalafi plugin you received in Step 1 of these directions.

- Click "Install Now"

- Once installation is complete click "Activate Plugin"
- Now your plugin is installed and activated, but it still needs to be configured
Configuring Your Plugin
Once the plugin has been installed and activated it needs to be configured so that you can start using it. If you haven't already, make sure your store is onboarded with Koalafi. Once we onboard your store, we can provide you with your public dealer id and private API key to complete the configuration. Checkout out our Getting Started page for more information on the onboarding process.
- On the WP admin, navigate to Payments Setting Page

- Click "All Payment Methods" A list of all available payment methods for your store will appear

- Find Koalafi in the list of methods. Immediately after activation, it will be toggled off. Leave it off for now

-
Click "Manage" - it will load the Koalafi settings page
-
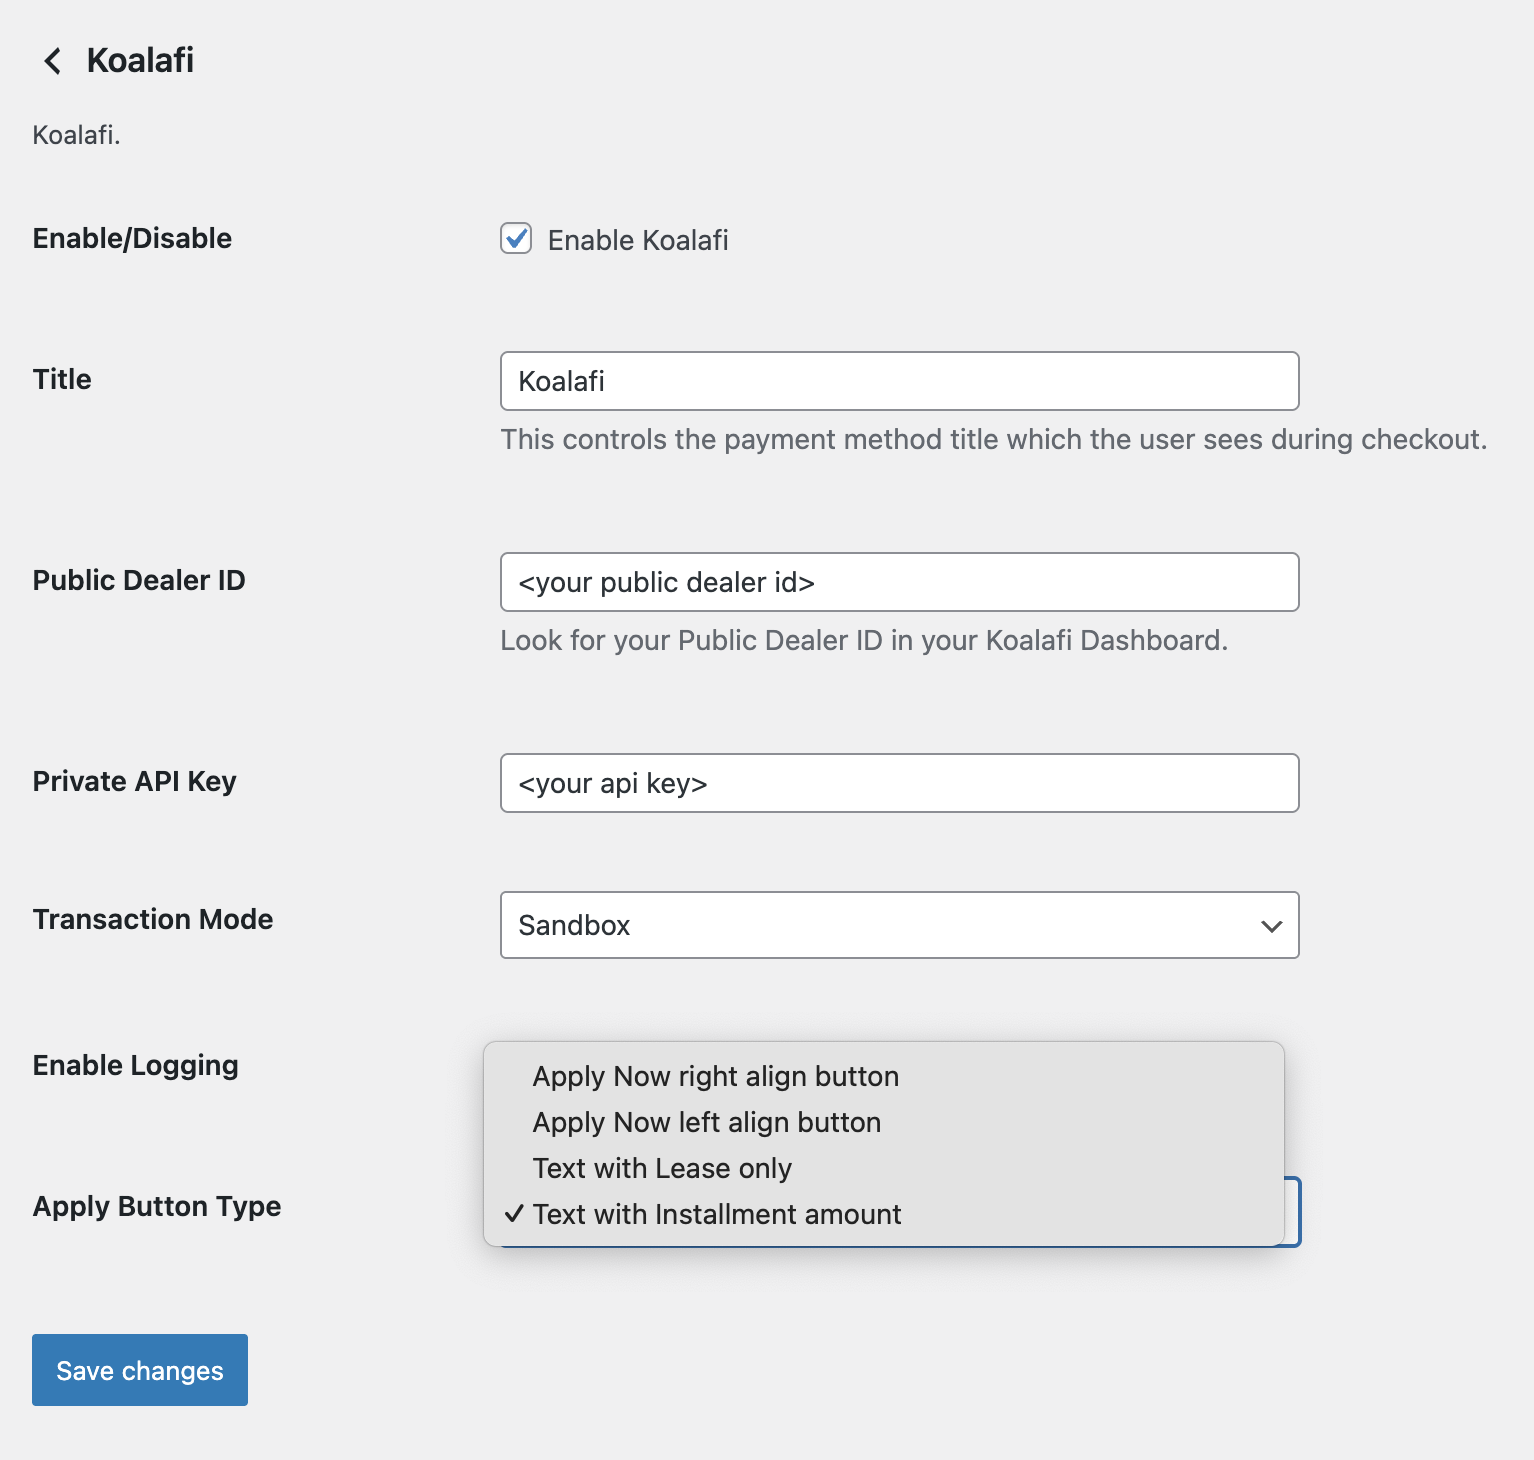
Add your public dealer ID and Private API Key to the appropriate fields. Make sure you use your sandbox values for sandbox and your live values for live
-
Select the Transaction mode - Sandbox is for testing, Live is for customer interactions. The appropriate key for the associated sandbox or live store needs to be populated accordingly. Turning your plugin to Live will direct the plugin to production and applications will be live.

-
Select your Apply Button Type
- "Apply Now right align button" display a button on the right side of the product screen
- "Apply Now left align button" display a button on the left side of the product screen
- "Text with Lease Only" displays a clickable lease only promotional text
- "Text with Installment amount" displays a clickable lease only pricing estimate text
-
Hit "Save Changes" and on the payments screen, enable Koalafi

-
You are ready to start using Koalafi throughout your site!
Marking Items as Non-leasable
Specifying whether a product is leasable is required when offering a lease-to-own financing option with Koalafi. Non-leasable products generally include weapons and non-physical goods such as gift cards, service fees, warranties or installation fees. Our WooCommerce plugin treats all products as leasable by default, so you'll need to update any product that falls into the non-leasable category.
Follow these steps to mark a product as non-leasable:
-
From the WP admin site go to Products > All Products
-
From the list of products, find the one you want to mark as non-leasable and click edit
-
Scroll to the bottom of the page and check the non-leasable box as seen in the image below:
-
The product is now marked as non-leasable. On the upper right hand side of the page click Update
Custom Button Configuration
You might want to add additional buttons on your site to direct customers to Apply for financing ahead of checkout. You have a few ways to add these buttons
WordPress Template Files
- Add the below code snippet to the template file and add your styling
[koalafi_approve_first_button]<button>Apply Now</button>[/koalafi_approve_first_button]Custom Page Builder
- On your custom page, enable shortcode to be placed
- Add the below code snippet to the template file and add your styling
[koalafi_approve_first_button]<button>Apply Now</button>[/koalafi_approve_first_button]Styling
All the styling changes will be made through the Wordpress admin page. To make styling changes to the plugin you will need to use the theme customizer or the theme style.css
All the plugin classes are defined within the plugin. If you unzip the plugin, you can look in koalafi_plugin > css > koalafi.css to find the defined classes. You can also use the developer tools to find the class names we are using for specific elements on the screen. If you are not familiar with developer tools we’ve included a quick how to below.
Customize with the Theme Customizer
-
On the WP-admin page click appearance >> Customize
-
This takes you to a new screen with your site on the right and a toolbar on the left. In the left toolbar click Additional CSS. In theme customizer you can navigate to your page on the right side of your screen and make CSS changes on the left. The changes should propagate immediately so you can quickly and easily make changes.
-
To make changes, you’ll need to know the class name for the style you want to override. The easiest way to get that is through using developer tools and inspecting the element you want to change. If you aren’t familiar with developer tools we’ve included a short how-to below. Note - it is helpful to leave the dev tools open as some of the plugin styles might be overwritten by the theme style and it’s easier to see that with the dev tools open.
-
In order to see your changes on the site as you make them, use the right side of the screen to navigate to the page that is displaying the element you want to change such as a product screen or the checkout page. You don't need to have the element you're changing open on the screen but it makes adjusting the styling faster and easier. If you don't have it open as you go, remember to review the screen once you're done to make sure everything looks like you'd expect.
-
In the text box add the class name you grabbed either from our plugin or using developer tools in the following format
<your class name> { <your-attribute>: <your-value>; } /*EX. with the Koalafi ApplyNow Button Class */ #koalafi-approval-first { background-color: #a6bfd5; color: #314054; width: 100px; text-align: center; font-weight: bold; padding: 5px 10px; font-size: 14px; border-radius: 5px; float: right; cursor: pointer; } -
Within the brackets add the different attributes with the values you want to change. Below we’ve included the class names and attributes for the Apply Now and Checkout Buttons
-
To save your changes your changes click publish at the top of the toolbar.
-
Note some of the styling might also be controlled by the theme and you won’t be able to overwrite it here. Instead you’ll need to edit the style.css of the theme directly.
Customize with theme style.css
-
To make changes, you’ll need to know the class name for the style you want to override. The easiest way to get that is through using developer tools and inspecting the element you want to change. If you aren’t familiar with developer tools we’ve included a short how-to below.
-
From this page you won't be able to see your site as you make changes, so be sure to copy down the class names you are trying to override. We've included the class names and attributes for our common Koalafi classes below, but you may also need to override some of the classes in the theme to get your desired style.
-
Once you have your class names login into the wp-admin page for your site
-
On the WP-admin page click appearance > Theme File Editor. Using the right toolbar, select the theme you want to adjust from the dropdown. Once you're on the theme you want to change, use the left toolbar to make sure you are in the stylesheet which has the filename
style.css -
More than likely, there will be some class names in the file, if you see one of the classes you want to adjust you can make changes to it in this file by adding, removing or changing attribute values.
-
If the class you're interested in changing isn't in this file, then you need to add it. You can add it in the following format:
<your class name> { <your-attribute>: <your-value>; } /*EX. with the Koalafi ApplyNow Button Class */ #koalafi-approval-first { background-color: #a6bfd5; color: #314054; width: 100px; text-align: center; font-weight: bold; padding: 5px 10px; font-size: 14px; border-radius: 5px; float: right; cursor: pointer; } -
To save your changes, click Update File at the bottom of the page.
-
Navigate to the pages that have the classes you updated to review your changes and make sure you're happy with the new style.
Apply Now Button on the Product screens
The styling for this button is controlled by the #koalafi-approval-first class. To change the appearance of that button you can change the different elements in this class:
- Background color - this refers to the color of the button itself
- Color - this is the color of the text on the button
- Width - this is the actual width of the button
- Text-align - how the text is aligned within the button
- Font-weight - the thickness of the font for the text in the button
- Padding - height and width of the text box within the actual button. The larger these numbers, the smaller the space for the text within the button becomes
- Font-size - the size of the text in the button
- Border-radius - controls the shape of the button. The higher the radius, the more curved the edges of the button become
- Cursor - this changes what the cursor looks like when someone hovers over the button. We recommend leaving the cursor set as is so that the button appears “clickable” to users
#koalafi-approval-first {
  background-color: #a6bfd5;
  color: #314054;
  width: 100px;
  text-align: center;
  font-weight: bold;
  padding: 5px 10px;
  font-size: 14px;
  border-radius: 5px;
  float: right;
  cursor: pointer;
}
Checkout Button
- The id for this button is
koalafi-shop-firstand the styling is controlled by theKoalafi-shop-firstclass. Most of the styling for this button is controlled by the Wordpress theme on your site, but this class currently controls:- Text-align - how the text is aligned within the button
- Cursor - this changes what the cursor looks like when someone hovers over the button. We recommend leaving the cursor set as is so that the button appears “clickable” to users
- You can overwrite any particular fields by adding them to this class.
#koalafi-shop-first {
  text-align: center;
  /* width: 100%;
  border: 1px solid #cfcfcf;
  background-color: #d9d5d5;
  color: black;
  font-weight: bold;
  padding: 10px; */
  cursor: pointer;
}
Using developer tools:
-
In Chrome, right click > inspect. This opens a panel for developer tools. You can choose to display the panel on either the bottom or right of your screen. In our screen shots below we have it on the right.
-
In the developer tools window, make sure your are on the first tab which is named
Elements(red box in the image below). This will show you the entire HTML for the page you’re currently on. -
Next to the tab at the top of the window, there will be two icons. Choose the icon that looks like a pointer on the screen (yellow box in image above). This will allow you to click on any element on the screen and have the corresponding HTML selected. This saves you the time of needing to hunt through all of the HTML to find the specific class you’re interested in. In our example, we have clicked the Apply now button and are looking at the
Koalafi-approval-firstclass. -
If you are planning to use the theme customizer, copy the class name because you will need that to make your changes. If using, we recommend switching over to the theme customizer at this time because it will show your changes on the screen and allow you to save your changes as you go. I find it helpful to keep the developer tools open even while using the theme customizer because some styles are controlled by the WP theme and it’s helpful to see what’s actually rendering on the page.
-
Once you have selected the element you want to edit, on the right of the developer console a second panel will open. Make sure you are on the styles tab (yellow box in the image below).
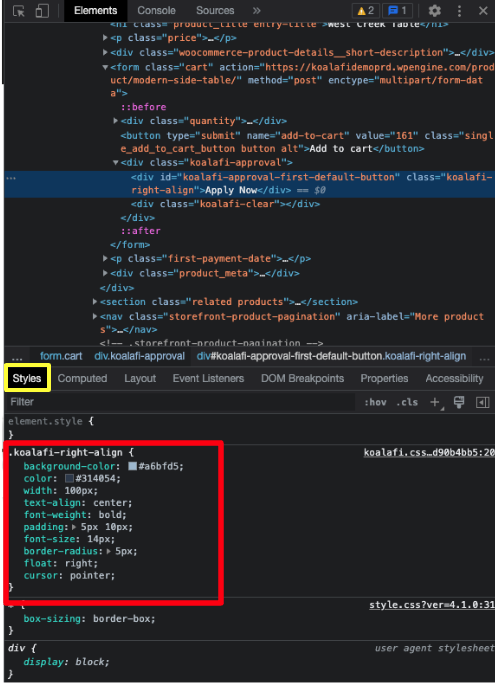
Developer Tools with Style panel on the bottom
- On this panel you should see all the classes on this element. Look for the specific koalafi class (should be at the top or near the top / red box in images above) and then you can tweak any value in the brackets. Some values are numeric, others are text based and some are from a predefined list. If you change a value that only accepts values from the predefined list, the browser should provide you with a list of acceptable values.
- If you refresh the page, it will return to all the defaults so if you like something be sure to capture the changes in the theme customizer, style.css or locally!
Updated 9 months ago